Composting & Your Green Bin

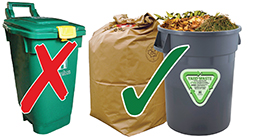
Leaf and Yard Waste, including grass clippings, are no longer accepted in green bins
Yard waste should go in a brown paper bag, or other open top rigid reusable container preferably marked with a City of Hamilton yard waste sticker. Yard waste stickers cannot be placed on green bins or blue boxes. Learn more about what to do with your yard waste.
Green bins are picked up every week. Your organics must be placed at the curb in front of your property between 7 pm on the evening before and 7 am on the morning of your scheduled pick up day. Find out what goes into the green bin.
Green Bin Tips
-
Line it with flyers, a couple sheets of newspaper or yard waste paper bags to keep it clean.
-
Put it out every week so food doesn't sit in your bin too long and attract bugs and animals.
-
Rinse it weekly to get rid of smells.
-
Keep it away from fences and deck railings so that animals can't get into it.
-
Keep it in a cool, shaded spot in the summer so that it doesn't get too hot and smelly.
-
Do not put any plastic, glass or metal in your green bin.
-
Do not use plastic bags.
-
Do not put diapers, pet waste (including cat litter) or sanitary products in your green bin.
Using the mini bin
Filling your mini bin at mealtimes
-
When preparing meals, put food scraps in your mini bin.
-
Remove food from its packaging before throwing it in.
-
Remove stickers from fruit and vegetable peelings. Stickers are garbage.
-
After eating, scrape leftovers from your plate into your mini bin.
-
If you are using paper plates, throw them in too! No styrofoam plates - they cannot be composted in the green bin program.
Mini bin to green bin transfer
-
When your mini bin is full, make sure the lid is latched and won't open on the way to your green bin.
-
Add a few sheets of newspaper to your green bin or line it with a paper leaf and yard waste bag to help soak up the juices from your mini bin.
-
Empty the contents directly into your green bin.
-
Inside your house, rinse your mini bin with warm water and a mild detergent.
-
Line it with newspaper and repeat the process.
Keep your mini bin clean
-
Emptying it into your large green bin and rinsing it every day or two so it doesn't get too smelly.
-
Lining it with flyers or a sheet of newspaper.
-
Use compostable liners with the approved logo

-
Almost half of household waste is organic, so keep your mini bin handy.
-
Find a new spot for your garbage pail so that you have to think before you throw something away - ask yourself, "Can this be composted?"
-
Your green bin should be stored in a location that is convenient.
-
Avoid storing it in direct sunlight.
-
Good storage spots include inside or along the side of your garage or outside your home, possibly your back yard.
-
You can even switch the location of your garbage can with your green bin.
-
Now that you have removed the organic material from your garbage can, it can sit outside untouched by animals.
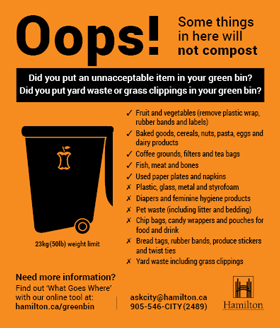
Effective April 1, 2019 Leaf and yard waste, including grass clippings will not be accepted in green bins.
Green bins should only be used for food scraps and soiled paper products like napkins and pizza boxes. Learn more about yard waste.
If you see a bright orange sticker on your green bin after the collection truck comes by, it means you have made a mistake. We use these stickers, called "Oops! stickers", to help you figure out what you did wrong. Remove anything that you've used to keep the lid shut on your green bin such as a bungee cord or a brick so that you don't get an Oops! sticker.
You will get an Oops! sticker if you put these things in your green bin:
- Animal carcasses
- Batteries
- Bio-hazardous waste
- Branches
- Clothing
- Compostable chip bags
- Diapers
- Dirt
- Dryer sheets
- Garbage
- Glass jars
- Grass
- Household hazardous waste
- Leaves
- Metal
- Pathological waste
- Pet waste
- Plants
- Plastic bags
- Plastic containers
- Plastic forks, knives and spoons
- Plastic plates
- Rocks
- Sanitary products
- Sod
- Styrofoam
- Tree stumps
- Twigs
- Weeds
- Wine bottles
- Wine corks
- Wood

Green bins and composting
Waste tips: How to sort items
Waste tips: Eliminate the "yuck" factor
See the composting process!
Pests and animals
Your mini bin and green bin are designed to be pest-resistant with tight-fitting lids. When closed properly, they are secure like a regular garbage can or bag. The best places to keep your green bin from pests and animals are in your garage or shed, or outside away from decks, stairs, walls or railings so that animals do not have any leverage to help them get in. Using a bungee cord tied over the lid (from the lips on each side of the bin) or a heavy object (brick or large rock) on the top of your green bin will also help. Bungee cords or any objects on top of your green bin MUST be removed before pick up. Also, sprinkling a strong smelling biodegradable repellent such as vinegar or detergent on your bin will help keep pests away.
Cleaning
The best way to keep your mini bin and green bin clean is by lining them with newspaper or other paper products such as a paper bag or paper leaf and yard waste bag to keep waste from sticking to the sides. Rinse your mini bin daily and your green bin weekly with a mild biodegradable detergent and warm water.
Odour
Odour is often caused by too much moisture. There are many ways to keep moisture (and odours) to a minimum.
-
Keep a 50-50 balance of wet and dry material. Alternate layers of food waste with layers of soiled paper towels, napkins, newspaper or leaves in your mini bin and green bin. Wrap food waste with newspaper (two or three sheets work well).
-
Avoid putting your green bin or mini bin in direct sunlight
-
Freeze items such as meats, bones and seafood until waste pick up day
-
Clean your green bin and mini bin regularly
-
Use lemon juice, vinegar, powdered laundry detergent (without bleach) or baking soda to hold down odours
-
Line your mini bin or green bin with paper bags, paper boxes or leaf and yard waste bags
Avoiding maggots in your green bin:
-
Flies are attracted to protein sources, mostly meat and bones.
-
Drain as much liquid as possible from your food scraps.
-
Wrap meat scraps and bones in a sheet of newspaper before putting them in your green bin.
-
Freeze meat, fruit, and vegetables in newspaper or paper bags and then put them in your green bin the night before pick up.
-
Alternate layers of kitchen waste with layers of paper products.
-
Hang some bruised eucalyptus, bay, or mint leaves in clusters or apply dabs of herbal oil to the outside of your green bin.
-
Line the outer rim of your green bin with salt or vinegar.
-
Clean your green bin regularly using warm water and mild soap. Wash and rinse your bin on your lawn, not near gutters or storm drains because the rinse water might flow into local creeks and waterways.
-
Keep the bottom of your green cart dry by lining it with newspaper, boxboard, paper egg cartons, paper take-out trays, or greasy pizza boxes to absorb liquid and prevent material from sticking to it.
-
Eliminate or minimize smells by sprinkling your bin with vinegar or baking soda.
-
Store your green bin in a well-ventilated area.
-
Put your green bin out for pick up every week, even if it isn't full.
-
Put some weather stripping along the top of your green bin where the lid rests.
Getting rid of maggots in your green bin:
-
Open the lid to allow birds to eat the maggots.
-
Cover the maggots with lime, salt, or vinegar.
-
Spray the top and inside of your bin with vinegar.

Download the Recycle Coach App
-
Use the personalized collection schedule
-
Receive customized notifications
-
Sort waste correctly with the "What goes where?" search tool
